Below is the feedback report that we received from Matt from the Nuneaton Museum and Art Gallery some time after the completion of the project.
Showing posts with label Unit 6 Practical Skills. Show all posts
Tuesday, 17 May 2016
Friday, 13 May 2016
Unit 6 Evaluation
Planning and Production Process
Before the group could begin the production process, we needed to establish exactly what our client (The Nuneaton Museum and Art Gallery) required from us. We were given a starting point which focussed around the theme of 'protest', however the client said that we had a lot of scope with the topic and could base the film around any subject of our choice, providing that in linked in with the starting point.
We split ourselves into smaller groups and brainstormed a great deal of ideas between us, considering carefully how each idea we had linked with the theme of 'protest'. This was particularly useful because it meant that we could discuss any ideas we had between us, everyone's voices could be heard and we really put some thought into where we could take the ideas we had in the production process. After this, we presented our ideas to the rest of the wider group and to the client, as well as Chris, who was the professional animator who helped us to create the short film. In this larger group discussion with the client included, we established that the film had to appeal to a wide range of people from different ages, backgrounds, genders and ethnicities so we had to keep this in mind when creating the film. We eventually agreed on the final idea which was the idea of 'big brother society' and cctv and surveillance because we believed that it is an issue that effects almost everybody.
After we had decided on the main idea for the film, we needed to build a narrative around it. We again split up into smaller groups and discussed any ideas we had and then fed them back to the wider group so that we could have an in-depth discussion on the storyline. Eventually we agreed upon the story that we used for the production piece and as a large group, we created a storyboard that outlined the narrative in brief and from there, we made a list of the characters that would need to be involved. We were then given the task of creating the characters and sets which was really challenging but very exciting at the same time. I really enjoy creative tasks, so I volunteered to help create the sets. We were split into groups again for this, as we had quite a few sets and characters to make and Beth, Jess and I were asked to make the little brother's bedroom. It was quite time consuming which I had not expected, as we had to add so much detail to each piece of the set in order for it to look good, however it was really insightful because it made me realise just how much effort goes into a stop animation such as Wallace and Gromit.
I had little experience with stop motion films, as we had only briefly touched on the subject in A-level photography, however Chris guided us through the process and showed us the basics on how to use the stop-motion software DragonFrame before we began filming. In the groups we created the sets and characters in, we began filming using DragonFrame, and Chris talked to us about 'onion skinning' which allowed us to see the previous frame before shooting the next one, so that when we put all of the frames together in post-production, it didn't look too jumpy and staccato.
Post-Production Editing
In regards to editing, Chris did a lot of the editing using his specialist software as he had more experience with using it than us. However, he did talk us through the process and demonstrate how to use Dragon Frame before we began the filming process.
Client Satisfaction and Feedback
Some time after the project's completion, we received a feedback report from Matt from the museum. Below are some of the comments he made:
- "The tight timetable for the project was ambitious. If we were to do this again a few more workshop sessions would be programmed in. As it was the students showed wonderful commitment in giving their own time to ensure things were completed on time."
- "For the students to be involved in a project from conception to launch, I believe, was very rewarding. I also believe that the practical skills gained were significant, from model making, script writing, sound recording and stop motion photography. This was certainly a broad base of practical skills with a wide application for the future."
- "The challenging timescale of the project gave the students an authentic taste of producing material in a ‘client based’ scenario."
What Went Well and What I Have Learnt
As this was my first experience with a client on a live brief, I found it really interesting and provided me with a good insight into what the media production industry is like; I now have experience with communicating with a client. I think that working as part of a large group was really beneficial, as there was so much work to be done and it was easily divided between everyone which meant that we could stick to our strict schedule and time frame and also produce a high quality production piece. I found it really interesting and useful learning how to use the industry standard software (DragonFrame) and the entire process taught me about how much time and effort goes into making this type of film.
Improvements
Although I believe that the project was very successful overall, there were some aspects that could have been improved. Coming up with the initial idea and the storyline was very time consuming, which meant that we had less time for the actual production of the film and also meant that we over-ran the original schedule which was not ideal. In retrospect, I think it would have been a much smoother process if the client had given us a more specific starting point or at least a few options to choose from, as the topic was so broad.
Thursday, 10 December 2015
'Little Brother'
Here is the finished video that the HNC class worked on in collaboration with the Nuneaton Museum and Art Gallery and Chris Bradley, a professional animator.
The theme of the film is 'protest', however the class were given free reign of how the film fitted with that particular theme. In the end, we decided as a group on the idea of 'Big Brother society' or surveillance. We chose this because it is a topic that is widely covered by the media and many people feel very strongly about the idea of being watched by the government whilst going about their every day business.
Matthew Johnson, who gave us the brief initially, writes for the Nuneaton Museum and Art Gallery's blog. Below are the posts that he wrote about the project, including various photographs of the hnc class working on the film.


Wednesday, 21 October 2015
Museum Project (Session 3)
During our third visit to the museum, we began to build our sets, props and characters. We were split into three groups and each group were assigned a set. Then we went off in our groups and began to brainstorm our ideas for the set that we had been given. The group that I had been put in had been assigned the 'Little Brother's Bedroom/Landing', so we thought of various ways in which we could decorate and furnish his bedroom and then started moulding furniture out of plasticine and wood, and making the wallpaper.
Shutter Speed Experiments
Shutter Speed and Frame Rate
Frame Rate = the number of frames captured by the camera per second.
1/30
Reflection
I think that my videos were relatively effective, although I can definitely room for improvement. The videos were all exposed correctly, however in the videos with the cars as subjects, the tripod is slightly wonky which does not look aesthetically pleasing.
Frame Rate = the number of frames captured by the camera per second.
Shutter Speed = Duration of the time each frame is exposed to light.
The standard setting for your shutter speed should be double your frame rate, or as close as possible. For example: 24p at 1/50.
1/30
For these videos, I shot on the standard kit lens (18-55mm). I used a shutter speed of 1/30 on a tripod, which is relatively slow and we can see a fair amount of motion blur when the subjects are moving.
1/100
I shot these videos on a 18-55mm standard kit lens.
18-55mm kit lens 1:100 from Frankie Smith on Vimeo.
Reflection
I think that my videos were relatively effective, although I can definitely room for improvement. The videos were all exposed correctly, however in the videos with the cars as subjects, the tripod is slightly wonky which does not look aesthetically pleasing.
Studio Lighting/Lighting
Rembrandt
Butterfly
Edge/Split
High-Key
Low-Key
Low key lighting is when there is a high amount of contrast and a small light source, which creates predominantly dark tones and a very dramatic looking video/image.
Use of Shadows
Rembrandt lighting is made up of one light source on one side of the face and a triangle of light on the other side of the face, below the eye called a chiaroscuro. The light source must be at a 45 degree angle to the subject and slightly higher than the subject.
Butterfly
Butterfly lighting was popular in the 1930s with Hollywood movie star portrait photographers. It is characterised by the butterfly shaped shadow below the nose and is produced by placing the light source above the face (between 25 and 70 degrees) and in line with the direction that the face is pointing.
Edge/Split
With split lighting, half of the face is lit and the other half is shadow. It is produced by placing the light source to the right or the left of the face.
High-Key
High Key is when there is a low amount of contrast and a large light source, often this is natural sunlight. There are often no shadows or very few shadows and the majority of the tones in the image/video are in the highlight region.
Low-Key
Low key lighting is when there is a high amount of contrast and a small light source, which creates predominantly dark tones and a very dramatic looking video/image.
Use of Shadows
In this video I was experimenting with the use of shadow and light in my images. I used a dark cupboard, and opened the door, allowing a pattern of light to form on the wall. This looked really interesting and effective as we are not able to tell exactly what is creating the pattern on the wall.
Wednesday, 14 October 2015
Health and Safety
Despite the majority of filming taking place on the college site, there are various subjects that means extra safety precautions must be made.
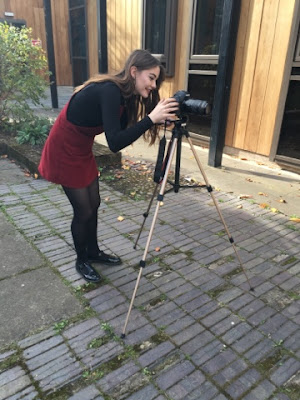
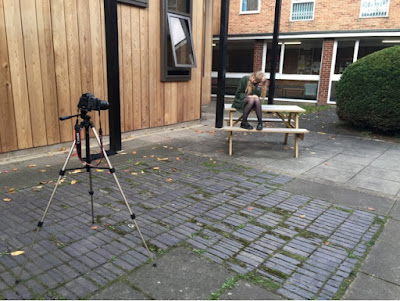
When conducting a shoot, there are many risks and hazards that I need to consider and take into account. I always ensure that there is plenty of space around me and the tripod so that myself and others can move around easily.
I also ensure that the space around me is tidy and that my tripod is visible to others so as to avoid any trips or falls which could injure people or damage the equipment.
As well as this, I need to ensure that there aren't any sharp objects lying around and if there are, I must ensure that they are used in a safe manner to avoid any injuries to the crew I am working with and the talents.
When shooting in the photography studio or in a general classroom set up, I always make sure that everyone with me is aware of the wires and cables, and ensure that these cables and wires are spread neatly across the floor and taped down, so as to avoid an trips or falls that could cause injury or damage to the equipment. When the studio lights are not in use, they must be switched off at the wall and then left to cool before being handled again as the bulbs become very hot during use and could burn someone or break when moved.
Equipment such as cameras, tripods, LED lights etc must be put away in a logical and safe manner so as to ensure that the next person to use them can do so safely and without being injured by any equipment falling from storage.
Below are some images of my camera set-ups when shooting, demonstrating how to use the camera equipment safely and effectively, without causing any harm to myself or others around me.


Museum Project
The HNC class have teamed up with the Nuneaton Museum and Art Gallery to create an animated video for their new exhibition, with the topic being 'protest'. Today, we had our first session with the museum which was very successful; we learnt a lot about how animation videos are made and brainstormed a lot of ideas in regards to the storyline for the video.

We are hoping to stick to this strict schedule, due to the fact that it is a live brief with a client and therefore, will need to be completed by a certain date in order to fit in with the exhibition itself.
Below is a photograph of my groups' brainstorm of ideas. We came up with ideas for a video based on feminism because we felt that this topic goes hand-in-hand with the idea of protest - we thought that we could link it to the suffragette movement or women's fight for rights to equal pay etc. After we had been split into groups, we sat down and discussed with the rest of the groups our ideas. Eventually, we agreed on a storyline based around the idea of 'big brother society' and surveillance. I think that this will make for a really interesting story that is relevant to wide variety of people which is what the museum was aiming for, as the people that visit it tend to be from all different backgrounds, races etc.
Wednesday, 7 October 2015
Aperture Experiments
Wide Angle Lens - f 8.0
60mm Lens - f2.8
Although I think that this video is very effective, I would next time use a tripod as the camera was quite shaky as I was panning.
18-55mm kit lens - f11
18-55mm kit lens f3.5
Wednesday, 23 September 2015
ISO Experiments at Night
Below are some examples of experiments I have carried out during the night, looking specifically at the ways in which changing the ISO has an effect on the overall video.
ISO 100 from Frankie Smith on Vimeo.
This is an example of the footage I shot on a Canon DSLR (EOS 700D) at night/low light. I shot this footage at the side of a road. I chose this location because I thought that the light from the headlights of passing cars would provide a good amount of light and movement to make an aesthetically pleasing video. My ISO was at 100 and I used an aperture of f5.6 to allow plenty of light into the lens as well as create a relatively shallow depth of field. My shutter speed was at 1/50 because my frame rate was 24 fps (your shutter speed should be double the frame rate).
ISO 1600 (1) from Frankie Smith on Vimeo.
This was my first attempt at shooting with an ISO of 1600.
ISO 1600 (2) from Frankie Smith on Vimeo.
Reflection
Process
I think that overall, my videos were relatively effective, particularly the ones that I used a tripod for. I worked with Beth (http://kechncbethanyheath.blogspot.co.uk) which helped a lot because it meant that we could help each other with any problems we faced.
Strengths and Weaknesses/Problem Solving
I would say that my strengths would definitely be the fact that I used a tripod, worked effectively as part of a team and my knowledge of the camera settings.
In regards to my weaknesses, I found it difficult to focus the camera on my subjects due to the low visibility at night. To solve this problem we moved to a different location with a larger light source.
Recommendations
If I were to shoot these videos again, I would be more ambitious with location and maybe experiment more with shots types, maybe use a panning shot or a tilt.
Tuesday, 22 September 2015
Sound/Audio Testing
These short clips are experiments with various microphones, in order to establish which record the best quality audio when filming.
In this video, we used only the in-camera audio to record Elliot talking. Although this does record sound, it is not very clear and there is a lot of extra noise picked up by the microphone.
In this video, we recorded Elliot talking using a Zoom H1 microphone which we attached to the hot shoe ontop of the DSLR camera we were using. This was far more effective than the in-camera audio, however we can still hear a little bit of background noise.
Finally, we used a boom microphone which was plugged into a recorder, which was then plugged into the camera. This produced the best quality audio, however, using this method of recording sound is not always suitable as you need at least two people to operate it.
In this video, we used only the in-camera audio to record Elliot talking. Although this does record sound, it is not very clear and there is a lot of extra noise picked up by the microphone.
Thursday, 17 September 2015
ISO Experiements
When planning a shoot, it is important to consider the type of lighting that is available as not only will it determine the overall exposure, but it will also have an influence on the camera settings that you will use. ISO dictates how sensitive the camera is to light, so the higher the ISO, the more light will be allowed into the sensor. It also allows for more grain or noise.
In the series of videos below, I experimented with the way that adjusting the ISO setting on the camera affects the overall exposure of the video. I aimed to establish what visual differences occur when adjusting the ISO setting, and whether or not it has much of an effect at all.
I recorded this extreme close up of Beth using ISO 100, as I was in a bright outdoor environment. There is no grain visible and the subject is very clear to see. You can see all of the textures of Beth's face, eye and hair.
I recorded this panning mid-shit of Beth in the photography studio using a single LED light source and an ISO of 16000. You can see that the video is more grainy than when I shot using ISO 100 and the details are less clear.
Wednesday, 16 September 2015
Aperture, Shutter Speed and ISO
The effects of Aperture, Shutter Speed and ISO
ISO
A camera's ISO is basically how sensitive it is to the light. The ISO setting is to give you an idea of how much light the sensor in the camera needs to register an image.
Low ISO settings (such as ISO 100) allow you to use a higher aperture setting or longer exposure time in bright light. Image quality is generally considered to be better when using a lower ISO, as less noise/grain is introduced into the image. Noise is basically random patterns of pixels/groups of pixels in which the colours are not based on light from the image.
Aperture
Aperture is the lens opening and gives you control of depth of field. It controls the amount of light passing through the lens of the camera and is measured in f/stops. The maximum aperture is where the opening is at its widest, allowing the most amount of light in, such as f/2. Depth of field is important to consider when filming, as it controls what feature of the image is sharply focused, and what is blurred or out of focus.
This is a good example of shallow
depth of field. The daisy in the foreground
is crisp and sharply in focus, whereas the daisies
in the background are blurred and out of focus,
we can only make out the basic shapes and colours
of them.
This is an example of a wide depth of field,
where the foreground, mid ground and
background is in focus.
Shutter Speed
Shutter speed is how fast the shutter of the camera closes when taking an image. It affects how sharp an image is when it is moving. A fast shutter speed freezes motion, whereas a slow shutter speed would create motion blur, where the path of movement from the object is visible.
Book References
Digital Photography Handbook
Tom Ang
2005
Penguin
Photographs taken from google images
Subscribe to:
Posts (Atom)